

- Accessing the Video Testimonials Section Settings
- 1. Section Header & Typography Settings
- 2. Multi-Device Layout & Column Controls
- 3. Slideshow Automation & Navigation Controls
- 4. Global Video Playback & Source Settings
- 5. Shoppable Video Blocks
- 6. Spacing & Mobile Optimization
- Sneaker Store Best Practices
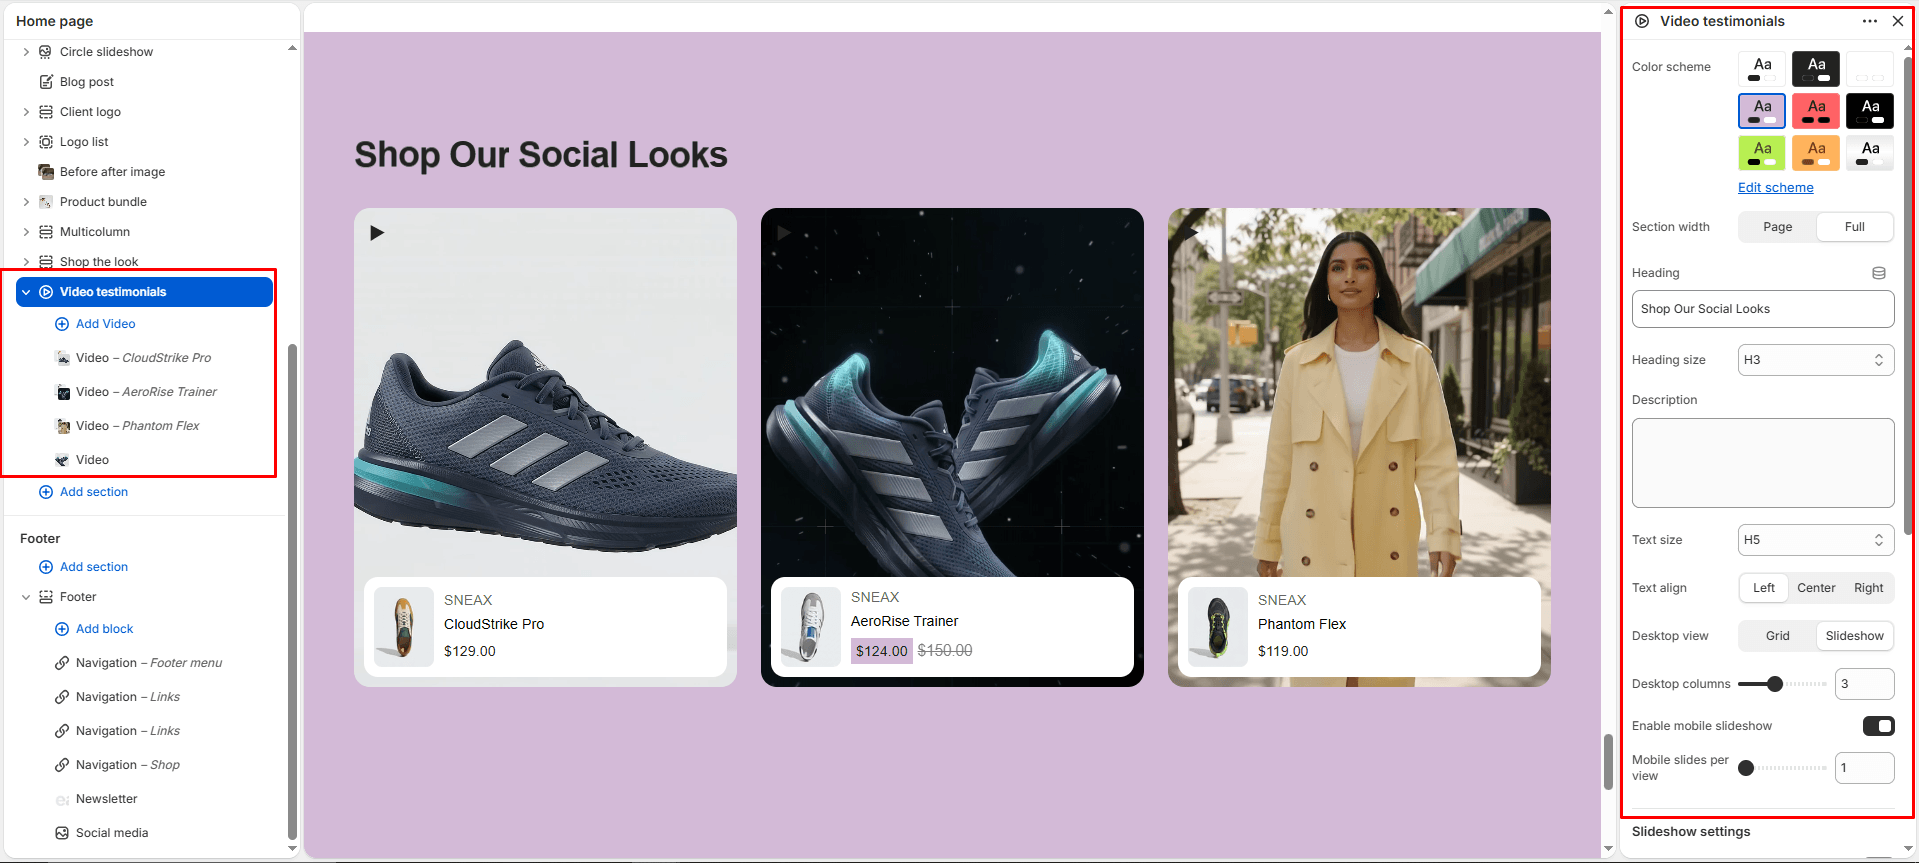
The Video Testimonials section brings the high-converting social commerce experience of TikTok, Instagram Reels, and YouTube Shorts directly to your Sneax storefront. Engineered with a vertical 4:5 portrait ratio, this section allows sneaker brands and boutique curators to showcase authentic on-foot video reviews, influencer styling clips, unboxing reactions, and sneaker care demonstrations.
Every video card integrates a floating, interactive Shoppable Product Card anchored at the base of the frame. When customers watch a sneaker being styled or reviewed, they can instantly see the shoe’s featured thumbnail, brand vendor, title, and live price tag, allowing them to click directly through to the product page.
Accessing the Video Testimonials Section Settings #
- From your Shopify Admin, navigate to Online Store > Themes.
- Click Customize next to your active Sneax theme.
- In the top dropdown template selector, select Home page (or any custom landing page).
- In the left-hand sidebar, click (+) Add section and select Video testimonials.
- Click (+) Add block under the section to add individual shoppable video cards.
1. Section Header & Typography Settings #
Configure section container dimensions, color palettes, and header text alignment:
| Setting | Type | Default | Options / Range | Description |
|---|---|---|---|---|
| Color scheme | Color Scheme | scheme-1 | Theme Schemes | Controls the master background, text, and navigation contrast for the section. |
| Section width | Select | page-width | page-width, full-width | Choose between a centered bounded container (page-width) or an edge-to-edge full width layout (full-width). |
| Heading | Text | Section heading | Text string | Main title displayed above the video cards (e.g., “COMMUNITY HEAT ON-FOOT”, “STYLED BY YOU”). |
| Heading size | Select | h4 | h1 to h6 | Sets the visual typography scale and hierarchy for the section heading. |
| Description | Text Area | Blank | Multi-line text | Optional subtitle copy explaining your social hashtag or customer review community. |
| Text size | Select | h5 | h1 to h6 | Controls font sizing for the descriptive copy. |
| Text alignment | Select | left | left, center, right | Sets the horizontal alignment for both the heading and description. |
2. Multi-Device Layout & Column Controls #
Switch between a high-impact desktop grid or an interactive carousel, and fine-tune mobile viewing:
| Setting | Type | Default | Options / Range | Description |
|---|---|---|---|---|
| Desktop view | Select | grid | grid, slideshow | Select grid to display a structured multi-column gallery, or slideshow for an interactive swiper carousel. |
| Desktop columns | Range | 3 | 1 to 6 (step: 1) | Determines how many portrait video cards appear side-by-side on desktop screens (3 columns is ideal for portrait video). |
| Enable mobile slideshow for grid | Checkbox | true | Checked / Unchecked | When desktop view is set to grid, checking this automatically converts mobile devices into a swipeable carousel to prevent vertical screen clutter. |
| Mobile slides per view | Range | 1 | 1 to 3 (step: 1) | Controls how many video cards are visible at once on mobile phone viewports (1 slide per view offers an immersive full-reel feel). |
3. Slideshow Automation & Navigation Controls #
Customize the carousel controls when slideshow mode is active:
| Setting | Type | Default | Options / Range | Description |
|---|---|---|---|---|
| Enable desktop slideshow | Checkbox | false | Checked / Unchecked | Activates carousel sliding mechanics for desktop screens. |
| Autoplay slideshow | Checkbox | false | Checked / Unchecked | Automatically advances slides continuously without manual user dragging. |
| Slideshow speed | Range | 30 | 10 to 100 (step: 1) | Adjusts the slide transition delay (lower values transition faster, higher values keep cards on-screen longer). |
| Show navigation arrows | Checkbox | true | Checked / Unchecked | Displays circular next/previous arrow navigation buttons. |
| Show pagination | Checkbox | true | Checked / Unchecked | Displays a modern, horizontal progress bar indicator showing current slide progression. |
4. Global Video Playback & Source Settings #
Define the media ingestion pipeline across all blocks in this section:
| Setting | Type | Default | Options / Range | Description |
|---|---|---|---|---|
| Video source | Select | uploaded | uploaded, url, image | Master format for all blocks: uploaded (native MP4 uploaded to Shopify Files), url (YouTube or Vimeo embed), or image (static portrait photos). |
| Autoplay video | Checkbox | false | Checked / Unchecked | When enabled, videos play silently in an automatic loop as soon as the user scrolls into view. |
5. Shoppable Video Blocks #
Each video card functions as an independent shoppable media block. Click (+) Add block > Video to add individual cards:
| Setting | Type | Default | Visibility Rule | Description |
|---|---|---|---|---|
| Video file | Video Picker | Blank | Visible when source is uploaded | Upload or select a native MP4 video file from your Shopify Files library. Best for silky smooth, native mobile reel playback. |
| Video URL | Video URL | YouTube default link | Visible when source is url | Paste a public YouTube or Vimeo video link. Accepts YouTube Shorts and standard video URLs. |
| Video thumbnail | Image Picker | Blank | Visible when source is image | Upload a high-resolution portrait image (4:5 ratio) if using static campaign lookbook photography. |
| Product | Product Picker | Blank | Always visible | Select the specific sneaker or streetwear product featured in the clip. Sneax automatically renders a floating card showing the shoe’s thumbnail, vendor, title, and price tag. |
6. Spacing & Mobile Optimization #
Ensure consistent breathing room above and below the video showcase:
| Setting | Type | Default | Options / Range | Description |
|---|---|---|---|---|
| Top padding | Range | 100px | 0px to 100px (step: 1px) | Desktop vertical padding above the section header. |
| Bottom padding | Range | 100px | 0px to 200px (step: 5px) | Desktop vertical padding below the video gallery/controls. |
Responsive Behavior: On screens narrower than 767px, top and bottom padding values are automatically halved (scaled down by 50%) to ensure mobile layouts remain tight, fast, and visually compelling.
Sneaker Store Best Practices #
- Highlight Authentic On-Foot Movement: Use 9:16 vertical videos (rendered cleanly in Sneax’s 4:5 frame) showing 360-degree on-foot sneaker looks, pant stacking, and outdoor natural daylight testing. Real UGC builds substantially more buyer confidence than static studio renders.
- Tag the Exact Sneaker Silhouette & Colorway: Always link the floating product card to the exact pair featured in the video (e.g., Air Jordan 4 Retro ‘Military Black’). Sneakerheads act on impulse when seeing how a shoe looks on-foot; a direct one-click path to the product page maximizes conversion rates.
- Use Uploaded MP4s for Clean Aesthetic: Choose
uploadedas your Video Source instead of third-party YouTube embeds. Native MP4s load without third-party iframe badges, external player branding, or cookie notices, delivering a premium TikTok-style experience.