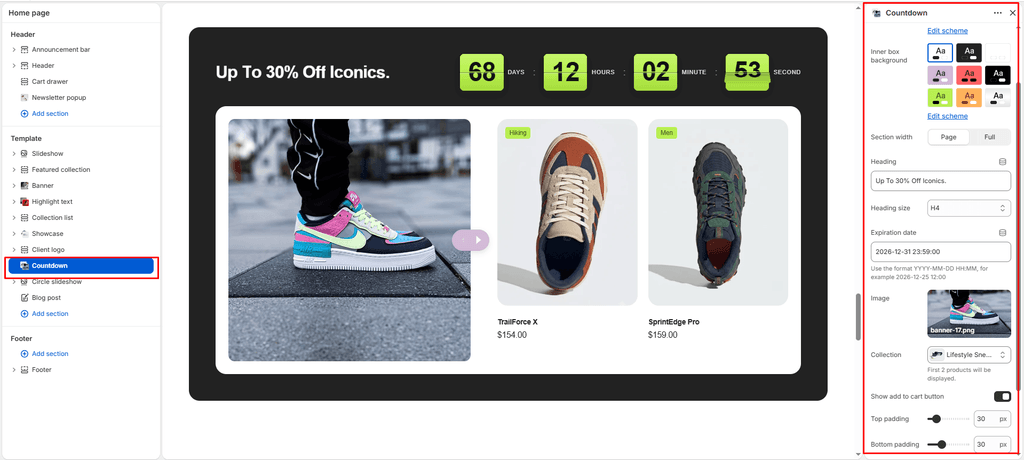

The Countdown section in Sneax is a purpose-built urgency and flash-drop merchandising powerhouse. Tailored specifically for limited-edition sneaker raffles, holiday flash sales, and deadstock releases, this section pairs an attention-grabbing 3D Mechanical Flip-Card Clock directly with a curated product carousel.
The section features a split architecture: the header displays your sale announcement headline alongside real-time flipping countdown digits (Days, Hours, Minutes, Seconds).
Accessing the Countdown Section Settings #
- From your Shopify Admin, navigate to Online Store > Themes.
- Click Customize next to your active Sneax theme.
- In the top dropdown template selector, select Home page (or any custom landing page).
- In the left-hand sidebar, click (+) Add section and select Countdown (or click on Countdown if already added).
- Configure the timer expiration date, attach your drop campaign photo, and select the featured collection.
1. Section Header & 3D Flip Timer Settings #
Configure container width, multi-layered color schemes, headline text, and target expiration timestamps:
| Setting | Type | Default | Options / Range | Description |
|---|---|---|---|---|
| Color scheme | Color Scheme | scheme-2 | Theme Schemes | Controls the outer section background canvas and header text contrast. |
| Inner background color | Color Scheme | scheme-3 | Theme Schemes | Sets the surface background color for the inner media and product carousel container. |
| Section width | Select | page-width | page-width, full-width | Choose between a centered bounded container (page-width) or an edge-to-edge canvas (full-width). |
| Heading | Text | Up to 36% OFF on shoes. | Text string | Prominent sale announcement or drop title (e.g., “MIDNIGHT HEAT DROP”, “FLASH SALE ENDS IN:”). |
| Heading size | Select | h4 | h1 to h6 | Sets the visual typography scale and font hierarchy of the section heading. |
| Expiration date | Text | 2026-12-31 23:59:00 | Format: YYYY-MM-DD HH:MM:SS | Target expiration timestamp. The clock automatically computes remaining days, hours, minutes, and seconds and animates downward in real time. |
2. Campaign Media & Swiper Product Showcase #
Set up the promotional editorial photo and link your footwear collection feed:
| Setting | Type | Default | Options / Range | Description |
|---|---|---|---|---|
| Image | Image Picker | Blank | Image upload | Hero campaign photograph anchored on the left side of the inner container. Includes floating previous/next pill buttons that navigate the adjacent product carousel. |
| Collection | Collection Picker | Blank | Store product catalog | Select the footwear or sale collection to display in the swipeable carousel track. |
| Show add to cart button | Checkbox | true | Checked / Unchecked | Displays a fast-action quick-add button directly on each footwear card in the carousel. |
3. Section Spacing & Mobile Optimization #
Manage vertical layout breathing room:
| Setting | Type | Default | Options / Range | Description |
|---|---|---|---|---|
| Top padding | Range | 80px | 0px to 200px (step: 5px) | Vertical padding above the countdown section on desktop monitors. |
| Bottom padding | Range | 80px | 0px to 100px (step: 1px) | Vertical padding below the countdown section on desktop monitors. |
Responsive Behavior: On screens narrower than 767px, top and bottom padding values are automatically scaled down by 50%. The split media and product carousel stack into a vertical flow, and the 3D flip timer automatically resizes its font and flap dimensions to fit smartphone displays without horizontal scrolling.
Sneaker Store Best Practices #
- Format the Expiration Date Accurately: Always enter the target time in strict
YYYY-MM-DD HH:MM:SSformat (e.g.,2026-11-28 00:00:00for a Black Friday drop). - Feature High-Heat Drop Imagery on the Left: Use the Image slot for an artistic, on-foot action shot or campaign lookbook graphic of the sneaker silhouettes featured in the sale. The floating arrow pill anchored on the image encourages shoppers to swipe through the collection.
- Keep “Show Add to Cart” Enabled: In flash sales and sneaker drops, seconds count. Keeping Show add to cart button enabled allows buyers to bypass product detail pages and snap up their size instantly.