

The Review Summary section in Sneax is an advanced buyer confidence and social proof tool specifically tailored for footwear retail. Buying sneakers online presents unique sizing and comfort anxieties for collectors (such as whether a silhouette runs narrow or true-to-size). This section addresses those exact concerns by transforming verified wear-testing data into visual Attribute Breakdown Bars.
Accessing the Review Summary Section Settings #
- From your Shopify Admin, navigate to Online Store > Themes.
- Click Customize next to your active Sneax theme.
- In the top dropdown template selector, select Products > Default product (or add this section to your Home page or brand landing pages).
- In the left-hand sidebar, click (+) Add section and select Review summary.
- Click (+) Add block under the section to add or customize individual Review bar metric blocks.
1. Section Layout & Typography Settings #
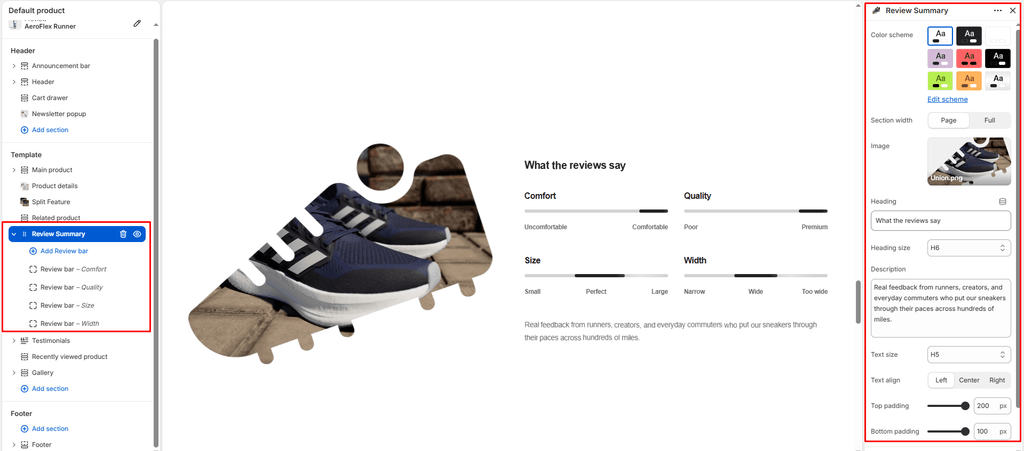
Configure container width, background color palettes, hero photography, and overview copy:
| Setting | Type | Default | Options / Range | Description |
|---|---|---|---|---|
| Color scheme | Color Scheme | scheme-1 | Theme Schemes | Controls the master background fill and text contrast colors for the section. |
| Section width | Select | page-width | page-width, full-width | Choose between a centered bounded container (page-width) or an edge-to-edge canvas (full-width). |
| Image | Image Picker | Blank | Image upload | Featured sneaker cutout photo anchored on the left. Automatically receives a subtle floating animation (statsImageFloat) that gently glides up and down. |
| Heading | Text | What the reviews say | Text string | Section title displayed above the attribute bars (e.g., “COMMUNITY WEAR-TEST SUMMARY”, “FIT & COMFORT BREAKDOWN”). |
| Heading size | Select | h2 | h1 to h6 | Sets the visual typography scale and font hierarchy of the section heading. |
| Description | Text Area | Every piece begins with... | Multi-line text | Editorial summary paragraph explaining wear-tester feedback, sizing recommendations, or break-in periods. |
| Text size | Select | h2 | h1 to h6 | Sets the font size of the descriptive text paragraph. |
| Text alignment | Select | left | left, center, right | Sets horizontal alignment for the heading and description. |
2. Content Blocks: Review Bar Metrics #
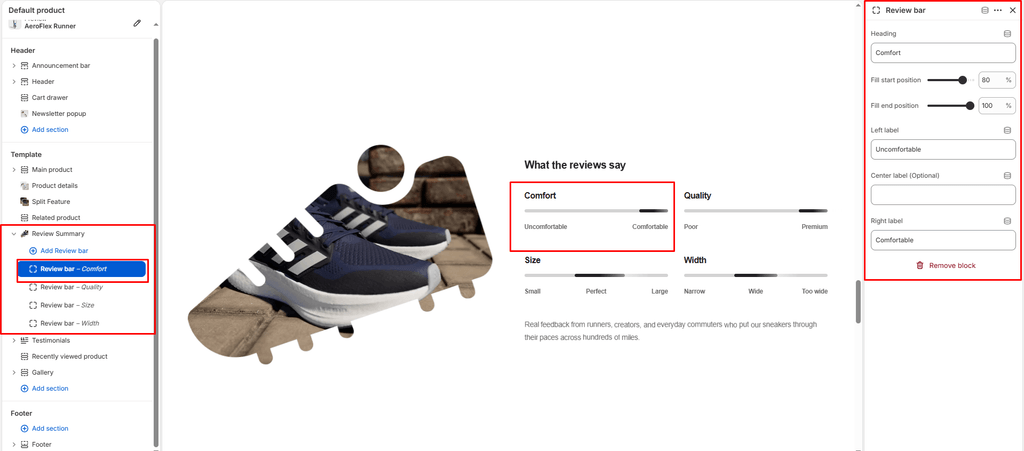
Each footwear characteristic is measured using a Review bar block, which renders as a range bar with three customizable spectrum labels:
| Setting | Type | Default | Options / Range | Description |
|---|---|---|---|---|
| Title | Text | Comfort | Text string | The characteristic being evaluated (e.g., “Fit & Sizing”, “All-Day Comfort”, “Leather Durability”, “Toe Width”). |
| Fill start | Range | 80% | 0% to 100% (step: 1%) | Left boundary percentage of the highlighted fill track. |
| Fill end | Range | 100% | 0% to 100% (step: 1%) | Right boundary percentage of the highlighted fill track (e.g., setting Start to 40% and End to 60% highlights a centered “True to Size” zone). |
| Left label | Text | Uncomfortable | Text string | Left spectrum boundary label (e.g., “Runs Small”, “Stiff”, “Narrow”). |
| Center label | Text | Blank | Text string | Optional middle anchor label (e.g., “True to Size”, “Perfect Fit”, “Standard”). |
| Right label | Text | Comfortable | Text string | Right spectrum boundary label (e.g., “Runs Large”, “Ultra Plush”, “Wide”). |
3. Section Spacing & Mobile Optimization #
Manage vertical layout breathing room:
| Setting | Type | Default | Options / Range | Description |
|---|---|---|---|---|
| Top padding | Range | 50px | 0px to 200px (step: 5px) | Vertical padding above the review summary on desktop monitors. |
| Bottom padding | Range | 50px | 0px to 100px (step: 1px) | Vertical padding below the review summary on desktop monitors. |
Responsive Behavior: On screens narrower than 767px, top and bottom padding values are automatically scaled down by 50%. The split container stacks with the floating sneaker image on top and attribute bars underneath. The 2-column attribute grid transitions to a single mobile column for effortless reading.
Sneaker Store Best Practices #
- Upload a Transparent PNG for the Floating Shoe: Cut out your featured sneaker on a clean transparent background (PNG or WebP).